🌎 HAPPY EARTH DAY! 10 Ways for a More Sustainable Life.

BEE THE CHANGE WE WANT TO SEE IN THE WORLD. It is easy to get discouraged with the state of our world in our day-to-day lives. I am guilty of often feeling that there isn’t much I can do just as 1 person. But the truth is, THERE IS! There are many simple switches and solutions that can drastically reduce our footprint on this planet. After all, Earth is our only home, and if we want to see our future generations thrive we must be the change.💖

1)👗 Less waste Laundry Detergent.

From a family with very sensitive skin, to a Mother of twin toddlers I can truly say this stuff is great. No adverse reactions from us and we are not sending waste to the recycling plant! Our clothes come out clean and fresh. I also reclaimed valuable storage space in the laundry room! Win-Win!!

2) ☕ Reusable K-Cups – Small change, HUGE IMPACT.

Even though big companies make recyclable pods. Can you ask yourself honestly, do you take the time to deconstruct the pod, rinse it out (yes, only items that are cleaned will be recycled) and put it in the blue bin? If you answered yes, you’re awesome, way to go! But if you are anything like me, a busy adult wanting their next cup of coffee quick, you tossed it in the trash. Many coffee companies offer the same coffee in ground or bean form.

#KPODCHALLENGE

I challenge you to put all of your pods in a bowl for just a week. At the end of the week view and reflect on your pile. That’s how much is going to the waste bin for just 1 adult. Multiply that by 52, and then how many years you have been using these products. The waste will still be at the garbage dump when our Grand-children’s, children, children are old.

This one small change you make will make a huge impact at the landfill.

🌱 FUN FACT – Coffee grounds can be great for your gardens. You can also dispose of them in the compost or green bin.

3) ♻️ REUSE – Here are some common household items you can reuse.

Get creative. Start saving your clear bags, jars, containers etc. When a need comes up to organize something, you will have an item on hand ready to use.

Glass candle jars – Take them to a local crafter to refill with more wax, or reuse them for jewelry, craft items, flowers, cotton swaps, cotton balls, pens/pencils.

Clear Zip Lock bags Contain puzzles, craft supplies, balloons, kids toys, coloring pencils, markers, and more.

Plastic Take-out containers – These are great for crafting paint trays.

Tissue Paper – Save them to wrap breakable items such as seasonal décor, or Christmas ornaments.

Coffee Tins– A Garage’s companion – fill them with nails, screws, bolts, nuts etc…

4) 🌻 Plant some flowers

Plant flowers to help promote the bee population. By protecting, nurturing and providing for our local bee population we can help the biodiversity of our communities and across the planet. We rely so much on these tiny creatures and should respect and help them more.

5) 🌲 SAVE THE TREES – Go Paperless / Buy Recycled Paper

Going paperless isn’t a new idea, and while we can limit our need to using paper, when it comes to work sometimes we still need printer paper. Support the companies trying to sell recycled paper which will support the manufacturing process of creating more recycled paper, and will eliminate more tree cuttings.

6) 🩸 Reusable Sanitary Pads

There are many reasons to make the switch to reusable pads.

Health – Disposable pads and tampons can contain chemicals, bleach, dyes, and pesticides.

Environment – Disposables last many years in the land fill that will still be decomposing long after you are gone.

Savings – They aren’t that difficult to wash, and can last several years, saving you more money in the long run too.

Fun – They come in fun, cute designs which makes your monthly experience a little more pleasant.

7) 🐝 Beeswax wraps

Reusable Wraps provide an eco-friendly option for covering your dishes, bowls, containers etc… Reduce your single use of aluminum foil and plastic wrap – saving you more money in the long run too.

*Tip – store them in the fridge for a longer life. I have had my set for a couple of years now and it is still in great perfect condition.

8) Glass Food Storage

This glassware is dishwasher safe, microwave safe, oven safe, freezer safe. They are clear for easy seeing what’s inside. You will do less hand washing, and no harmful plastics are being used to store your food in the freezer or heat in the microwave.

9) 🚯 Zero Waste Shopping

Offering package free solutions for bulk foods, house hold products. Featuring locally made products and sustainable alternatives to everyday items.

10) Use natural cleaning products.

Health – Reduce your use of chemicals. While killing many harmful bacteria in your home. These cleaning solutions are safe for families with kids and pets.

Environment – Chemicals from cleaners enter the waterways and pollute our fresh water systems. Our single use plastic containers fill the landfills.

Savings – Simply wash and reuse, these products can last many years, saving you more money in the long run too.

*Bonus* reclaim more valuable space in your cupboards!

📺 I encourage you to watch these documentaries on sustainability.

🌳 a life on our planet

🐟 Seaspiracy

🚮 Broken – Docuseries – Recycling Sham

Of all the items that are sent to the blue bin how much of it is actually recycled?

If you made it this far, thank you for reading! I strongly believe that if we all focus on our personal growth towards sustainable living our small changes will send ripples through the world in a positive way!

Woodland Baby Shower

My Mom and Step-Mom hosted a baby shower for me this Spring. They graciously allowed me to help plan the decorations and some food. I decided to go with a Woodland theme. Here are a few fun detail photos from the shower. We are expecting two baby girls, but we didn’t go big on pink.

I made the wreath myself with silk flowers from our local craft store – Michaels.

The cake and cookies I got professionally made from a local baker. They were amazing and such a hit. Everyone loved them.

Most of the animal decor I reused from my Easter, Christmas and year around home decor collection. I was lucky enough to borrow some from my sister as well. Majority of the items were purchased from Michaels, Pier 1 Imports, Home Sense and Canadian Tire.

We used pine cones to display some food items and placed them around some tables.

The wood slabs were cut from my Dad, and a friend.


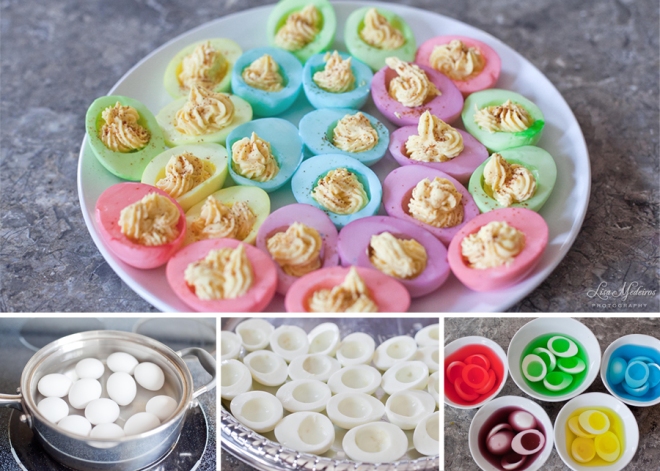
Colorful Deviled Eggs

With Easter just over a week away I thought I would share these fun coloured eggs I have done over the years. These are guaranteed to be a hit for Easter!

Easter

Colorful Deviled Eggs

1 Dozen Eggs
1/2 cup Mayonnaise
Food Colouring
Vinegar
Chipotle Powder or Paprika

1) Put the eggs in a pot with cold water and turn the heat on high. Once the water is boiling cover the pot, and turn the heat to medium for about 15 minutes.

2) Once the eggs are cooked, cool them with cold water and peel them.

3) Slice them in half, and spoon the yolks into a medium sized bowl.

4) Place the egg white portion of the eggs into a bowl with water and a few drops of food colouring till you are satisfied with the colour, Make sure there is enough water to cover the eggs. I also add about a teaspoon of vinegar to the water to help with the colouring process. Let the eggs sit in this mixture for about 30 minutes, or until you reach the colour you desire. They will turn out to be a lighter pastel colour.

5) In a medium bowl with a fork mash the egg yolks, and then add the mayonnaise together.

6) After you are finished colouring the eggs, take them out of the water and let them dry on a paper towel.

7) Place a pastry bag with a medium star tip in a tall glass, and fold the bag over the glass. (You can also use a sandwich bag and just cut a corner off.) Fill the bag with the yolk mixture and pipe the mix onto the egg whites.

8) Top with your eggs with chipotle powder or paprika and place them on a pretty serving dish. You can also top with chives or bacon if you wish. I like the chipotle powder because it gives it a tiny smoky kick.

Having a themed party?  Try using only one or two colours, and put a few drops in your yolk mixture too for an added colour boost.

Easy Way to Backup Documents, Photos, & Video

back up

Never underestimate the importance behind backing up your files. If you are like me you have lost important pictures, files, and video due to unfortunate events like a computer crashing, hard drive malfunction, lost or damaged memory cards/cell phones. It happens to all of us.

It is very important to back up your files. Once lost it can be very costly for an I.T tech to try and recover missing files, and that is not a guarantee.

But don’t fret, backing your files can be really easy!

I recommend having an external hard drive separate from your computer. This is for a couple reasons.

1) You can move it around to different devices – office computer, personal computers, laptops etc….

2) If your computer crashes it is separate so you don’t need to worry about recovering those files.

You can purchase them from places like Future Shop, Best Buy, Canada Computers, or just about anywhere you can purchase a computer. They range from $50-150. I recommend checking your local flyers as they ALWAYS go on sale. I recommend the Western Digital brand, and 500 GB, 1000 GB or 1 TB in size. Make sure to purchase a drive that will allow you enough space to backup all your devices with some room to grow.


Here is my simple step by step guide for WINDOWS USERS backing up once you have purchased and connected/installed your hard drive to your computer:

1) Rename your hard drive to “Back up” you can do this simply by navigating to your PC drive screen. This us usually called “My PC, My Computer, or This PC“. Once there right click your NEW hard drive and select RENAME.

2) Open the hard drive, create a new folder, name it what you want E.G “Lisas PC”, open this folder, and leave this window open.

3) Open your computers hard drive screen again in a new window. Here you will see your computers internal hard drive. Open it, select USERS, then the specific user you are backing up, in this case it’s LISA.

4) Select all (CTRL A), copy and paste into the new folder. You can do this several ways.

You can either then press CTRL C, go to the new folder you previously made in the new hard drive in this case Lisas PC, and then press CTRL V.

or you can right click the highlighted files, and while holding down the right click move your mouse over to the new folder and select COPY HERE.

Once your copying is complete you are done!!! Simple, easy, and you won’t regret it!!! I recommend backing up at least once a month.


Here are some screen shots if you want to visually see my step by step process.


FREE DOWNLOAD – I have attached a Back Up log list if you want to keep a log of what files you backed up and when. This can help you keep track of all files you have previously backed up.

Back Up Log Sheet(PDF) Back Up Log Sheet(EXCEL)


Tips for backing up your Cell phone photos and video

I recommend using DROPBOX, it’s a free, secure way to back up your phone and transfer the files to your computer. You can expand your account space for free by referring friends/family to join, or you can purchase larger space.

Once you have signed up you can install the free app to your phone, and PC. Then you can set up an automatic photo/video upload. You can modify the settings to copy your media over WIFI only to save data. Once you have successfully set that up, you can sync your photos to your Dropbox account. You can sign in to your Dropbox account online from any computer, or the desktop app to save your photos there. Dropbox even has the capability to sync photos right from your phone to your PC.

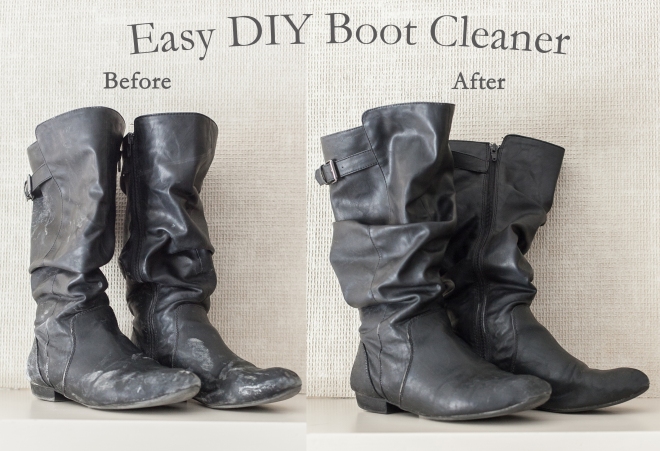
DIY Natural & Easy Boot Cleaner

DIT Boot Cleaner

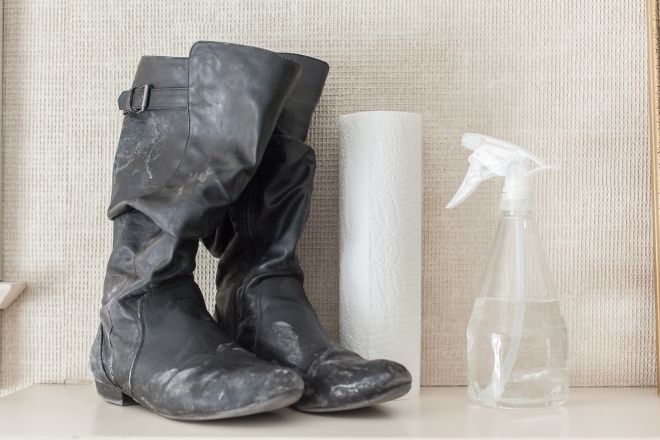
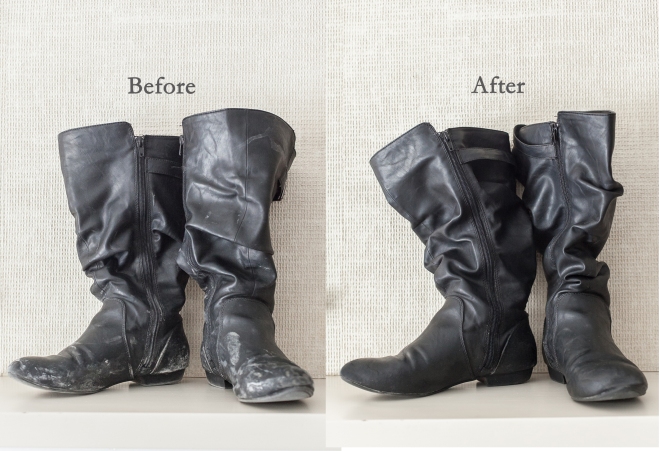
I have made a fantastic easy DIY boot cleaner that cleans salt off your boots in seconds!!! No more scrubbing with soap!

It’s super simple, all you need is vinegar, water, and a paper towels. Although I am sure cloth towels would get the job done. I also like putting the vinegar and water in a spray bottle to use. Then I can easily use it  around the house too, because it’s a great super cleaner!

The ratio I used here was about 2/3 vinegar to 1/3 water, and this ratio works fantastically!

I simply spray my paper towel and wipe the boots, and voila – it’s clean! It dries super quick as well. Follow with your favourite boot protector product.

_MG_6316-Edit 2 3

Happy Cleaning!

~ Lisa

5 Tips for Summer Photography

5 Tips for Summer Photography:

18

1. Bug Spray – bug spray goes a long way, prepping yourself and your family against those pesky critters will keep your focus on each other and not those buggers!
2. Clothing – normally neutral clothing is great for family portraits, but in the summer it’s fun to wear those bursts of colour to brighten up the photographs. I recommend picking a colour and staying in that range, and complimenting those colours with neutrals. eg, green and gray, or corals and blue.
3. Timing – the time of day can reflect on the types of photographs you can expect to receive. If you go during “golden hour” (just before sunset) you can get those golden back-lit photos.
4. Weather – while the weather is usually sunny in the summer, it’s still great to go on overcast days; there are more options available for locations. It’s also a good idea to plan ahead and pick a secondary rain date.
5. Have Fun – that’s what summer is all about after all right? Let loose, relax, and have some fun. Let kids be kids, let siblings interact with each other. Those candid moments, laughter, and smiles can be the unexpected photos you will cherish.